Calibration standards such as opens and shorts have traditionally been modeled by fitting the actual response of the standard to a third-order polynomial.1 This approach has limitations as the frequency range of the standards increases. Multiple-band models for the same calibration standard were created in an effort to minimize the fitting errors. This required the user to measure the same standard several times — once for each model.
Figure 1 shows a comparison of the accuracy of three different polynomial models for an offset short. Model accuracy is the difference between the polynomial model and the data used to fit the polynomial. The low band and high band models optimize the accuracy over portions of the frequency band while the broadband model optimizes the accuracy over the full frequency band. A new calibration standard model type, the data-based standard model, has been introduced to overcome this limitation and to reduce the errors in calibration that had previously been introduced by the fitting process, as illustrated in Figure 2.
Often, more calibration standards than the minimum required are measured. This may be necessary to maintain distinction between calibration standards over a very wide frequency range. When the accuracy of a single standard is not adequate over the full frequency range, more standards are required, such as a fixed load and sliding load combination. Traditionally, in each of these cases, all of the standards are measured over the entire frequency range, although some of the data is simply ignored. This can lead to discontinuities in subsequent error corrected measurements. Weighted least squares (WLS) calibration uses all of the data measured on multiple standards, while seamlessly weighting each standard relative to its accuracy. The data-based standard model includes uncertainties as part of the definition. For non-data-based calibration standard models, default uncertainties are assigned to these models, based on the specifications of the calibration standard.

Fig. 1 Comparison of 1.85 mm short 1 (5.4 mm offset) polynomial models accuracy.

Fig. 2 Data-based and polynomial models data flow.
The “unknown through” calibration method was introduced by Andrea Ferrero and Umberto Pisani2,3 in 1992. It was based on the general theory of VNA calibration that brought about the TRL family of calibrations in the mid-1970s.4,5 This full two-port calibration technique is well suited for calibrating a vector network analyzer with immovable test ports, to measure non-insertables, odd shape and multi-port devices. The through “standard” does not need to be known and does not need to be perfect.
Data-based Calibration Standards
Data-based calibration standards eliminate the requirement to fit the response of calibration standards to a set of predefined calibration models, such as coaxial or waveguide. This increased flexibility will also enable users to define more easily their calibration standards and virtually eliminates any error that previously would have been introduced by the curve fitting process. An example of the data-based standard model data file, based on the CITIFILE format, is shown in Appendix A. The data may be obtained by device modeling based on physical dimensions and properties or from accurate measurements, as illustrated in Figure 3. Uncertainties in the data are included.
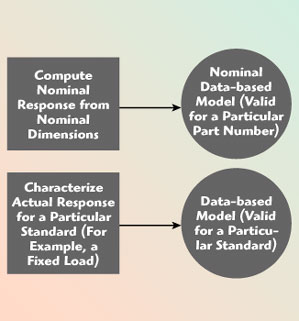
Fig. 3 Data-based modles used as a generic nominal model or as a model for a specific device.
The generic VNA model for a fixed load is that its reflection coefficient is equal to zero. The actual reflection coefficient of the load is the dominant factor in the directivity and source match errors. If a fixed load can be characterized using a more accurate calibration, the resulting characterization data, with uncertainties, is used as the data-based standard definition. Calibrations using the fixed load and its associated data-based model will have an accuracy approaching the accuracy of the system that characterized the fixed load. Residual calibration errors now depend on the uncertainty of the characterization rather than the specification of the load.
Weighted least Squared (WLS) calibration
Basic Theory6

Fig. 4 Flow graph representation of a measured reflection coefficient.
Figure 4 is a signal flow graph representation of the relationship between the measured reflection coefficient (?m) and the actual reflection coefficient (?a) plus systematic errors of directivity (e00), reflection tracking (e10e01) and source match (e11). Equation 1 can be derived from the signal flow graph:
?m = e00 – (e11e00 – e10e01) ?a
+ e11?m?a (1)
To determine the systematic errors at least three distinct and known devices must be measured. The general solution may be formulated in matrix form:

Better accuracy can be achieved by measuring more than three standards. Electronic calibration, (ECal), introduces a least squares solution to increase the accuracy obtainable with the over-determined system.7 Equation 2 can be rewritten as a matrix equation:
A × x = b (3)
The optimal least squares solution to Equation 3 is given as
x = (AH × A)–1 × AH × b (4)
where
AH = conjugate transpose of A
The least squares solution works well when all observations of calibration standards are known with the same accuracy. This is a reasonable assumption for ECal, but may not be valid when it is applied to calibrations using other calibration kits.
A weighted least squares solution approach provides a simple solution to handle the case where the calibration standards do not have the same accuracy.8 If the uncertainties of the standards are uncorrelated, an optimal solution is best obtained by multiplying each equation by a weighting factor that includes both the accuracy of the standard’s model and the proximity of the standard’s response to the other measured calibration standards. Equation 2 becomes
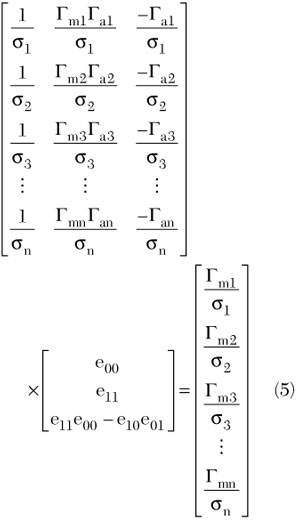
where
?i = weighting factor for the ith equation.
Measurement Results
The benefits of the weighted least squares calibration in conjunction with the data-based model are evaluated using the Agilent 85058B calibration kit. This kit has similar calibration standards for each sex, consisting of a low band load, an open, a 5.4 mm offset short, a 6.3 mm offset short, a 7.12 mm offset short and a 7.6 mm offset short.
The improvements due to the weighted least squares calibration and the data-based model become readily apparent when comparing measurements made with this technique to measurements made after a traditional frequency limited, three standard, one-port calibration and to the traditional polynomial model-based weighted least square calibration.
Measurements of devices that were not used in the calibration process, a flush short and the flush short connected to a 5 cm airline, were performed. Figures 5 and 6 compare the measured S11 magnitude and phase of a flush short. The S11 parameter of a perfect flush short should have a magnitude of 1 (or 0 dB) and a phase angle of 180°. Deviations from those ideal values indicate errors in the measurement. The DB WLS (data-based standard, weighted least squares) calibration results are much closer to the ideal values.

Fig. 5 Comparison of the measured S11 magnitude of a flush short.
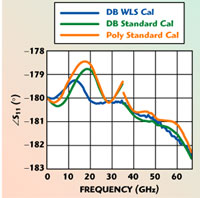
Fig. 6 Comparison of the measured S11 phase of a flush short.
A precision bead-less coaxial airline introduces very low reflections. When terminated with a short, the magnitude of the measured reflection at the input of the coaxial line should be similar to its insertion loss. Ripples in the measured data indicate measurement errors caused by residual directivity, source match and reflection tracking errors. Figure 7 shows how the three calibration methods compared.
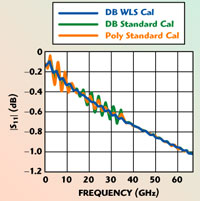
Fig. 7 Comparison of the measured S11 magnitude of an airline terminated in a short.
The benefits of both weighted least squares calibration and data-based calibration standard models are clearly demonstrated by comparing them to a commercially available sliding load kit. The sliding load calibration kit uses the traditional modeling for the coaxial open, short, load and sliding load. A customized set of definitions for each calibration device was provided. A standard open, short, load (OSL) sliding load calibration was performed using this kit. The Agilent 85058B kit, with data-based calibration standard models, used the WLS calibration. After calibration, two different devices were measured, a flush short and the flush short at the end of a 5 cm airline. Each device was connected and then measured with each calibration activated. None of the comparison devices were used as calibration standards during either calibration. Figures 8, 9 and 10 compare the measurements based on the two calibrations.

Fig. 8 Measured S11 magnitude of a flush short. | 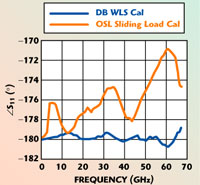
Fig. 9 Measured S11 phase of a flush short. | 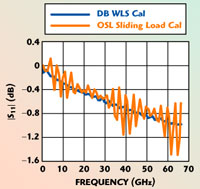
Fig. 10 Measured S11 magnitude of a 5 cm long airline terminated in a short. |
Unknown Through Calibration
The theoretical base for the unknown through calibration is provided in the literature.8 This method has the following requirements:
• The systematic errors, directivity, source match and reflection tracking of each test port can be completely characterized.
• The unknown through must be reciprocal, Sij = Sji.
• The phase response of the unknown through must be known to within a quarter of a wavelength.
• The VNA signal path switch errors can be quantified. A more detail treatment of this topic was presented in References 9 and 10.
Applications
Immobile Test Ports or Physically Long Devices
Quite often, a direct port 1 to port 2 through connection cannot be made because of physical restrictions, such as wafer probe stations and some test fixtures. To calibrate such a system, the traditional SOLT calibration requires a known through adapter or cable assembly. These known devices require periodic re-characterization to maintain calibration accuracy. In addition, uncertainties of the known through characterization are propagated to the uncertainties of the transmission tracking terms and the load match terms. No characterization is needed using the unknown through calibration method.
Test port cables, even the best ones, degrade calibration accuracy when moved. Figure 11 shows how much transmission error some cables can cause with a 90° bending. For physically long devices, the test ports must be moved substantially from the calibration through position. By using the unknown through calibration method, the test ports can be placed and calibrated at the connection point and thus cable movements are reduced. Figure 12 shows the difference between a traditional flush through calibration and the unknown through calibration. Notice that the unknown through results are less noisy and less spurious. The total movement is only 3.5 inches.

Fig. 11 Errors caused by cable bending.

Fig. 12 Comparison of S21 measurements of a 3.5" long cable.
Non-insertable Devices
To test non-insertable devices, the adapter removal calibration has been used. It usually requires two full two-port calibrations or one full two-port calibration plus a one-port calibration. In contrast, the unknown through calibration is as simple as a standard SOLT calibration, as illustrated in Figure 13. Figure 14 compares the measurement results of the two calibration methods. A 1.85 mm female-to-female adapter was measured using the two calibration methods. Again, the unknown through calibration provided a cleaner measurement.

Fig. 13 Adapter removal calibration sequence versus unknown through calibration.
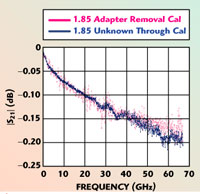
Fig. 14 Comparison of S21 magnitude measurements of a 1.85 mm femaile-to-female adapter.
Not In-line Test Ports and Multi-port Devices
When the test ports of the device under test are not in-line, the test port cable(s) must be bent and moved to accommodate their respective orientation. This is especially true for multi-port devices such as power splitters and directional couplers.
Many characterization methods have been proposed to extract three-port S-parameters from two-port measurements.11 Because most three-port devices are non-insertable devices, an adapter removal calibration method must be used. To measure a three-port device with a two-port network analyzer, the device must be measured three times, as illustrated in Figure 15. In addition, most three-port devices do not have in-line connectors. Test port cables need to be moved and bent to accommodate the device’s connector orientations. These cable movements, after calibration, cause degradation to the measurement accuracy. The unknown through calibration method minimizes these cable bending and movements, as illustrated in Figure 16.

Fig. 15 Measuring a three-port device with a two-port VNA using he conventional method.
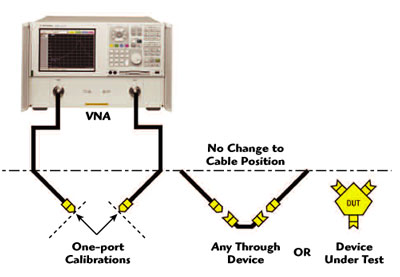
Fig. 16 Measuring a three-port device with a two-port VNA using the unknown through method.
In conjunction with the unknown through calibration, a two-port to three-port reconstruction method is proposed to characterize the S-parameters of three-port devices.12 This makes reciprocal three-port measurements almost as simple as two-port measurements.
If a multi-port VNA is available, the multi-port calibration is greatly simplified by using the unknown through method.13 Each test port is calibrated first using the appropriate one-port calibration standards, mechanical or electronic. Any connector combination is allowed. A minimum set of adapters, cables or even the device under test can be used as the unknown through to finish the calibration. For example, a power splitter or a directional coupler can be the unknown through since it meets the reciprocity requirement, as shown in Figure 17.

Fig. 17 Multi-port using the unknnown thorugh calibration method.
Conclusion
The enhancements to vector error correction, provided in the new generation of VNAs, open the possibility to more accurate measurements and greater flexibility in the calibration process. Data-based standards eliminate the standard modeling challenges previously faced. Now users have a convenient way to model accurately a variety of standards, including on-wafer standards, stripline standards, microstrip standards, etc. This article also demonstrates the unprecedented accuracy that weighted least squares calibration has achieved. The unknown through calibration makes non-insertable calibration as simple as insertable calibration and at the same time minimizes errors caused by test port cable movements. It also eliminates the need of a “perfect through” to calibrate a multi-port network analyzer.
References
1. Specifying Calibration Standards for the Agilent 8510 Network Analyzer, Agilent Technologies Inc., Product Note 8510-5B, 2001.
2. A. Ferrero and U. Pisani, “Two-port Network Analyzer Calibration Using an Unknown ‘Thru,’” IEEE Microwave and Guided Waves Letters, Vol. 2, No. 12, December 1992, pp. 505–507.
3. A. Ferrero, U. Pisani and F. Sanpietro, “Save the ‘Thru’ in the ANA Calibration,” 40th ARFTG Conference Digest, December 1992, pp. 128–135.
4. B. Bianco, M. Parodi, S. Ridella and F. Selvaggi, “Launcher and Microstrip Characterization,” IEEE Transactions on Instrumentation and Measurement, Vol. 25, December 1976, pp. 320–323.
5. R.A. Speciale, “A Generalization of the TSD Network Analyzer Calibration Procedure, Covering N-port Scattering Parameter Measurements, Affected by Leakage Errors,” IEEE Transactions on Microwave Theory and Techniques, Vol. 25, No. 12, December 1977, pp. 1100–1115.
6. D.V. Blackham, “Application of Weighted Least Squares to OSL Vector Correction,” 61st ARFTG Conference Digest, Philadephia, PA, June 13, 2003.
7. K.H. Wong and R.S. Grewal, “Microwave Electronic Calibration: Transferring Standards Lab Accuracy to the Production Floor,” Microwave Journal, Vol. 37, No. 9, September 1994, pp. 94–105.
8. G. Strand, Linear Algebra and Its Applications, Second Edition, Academic Press Inc., New York, NY, 1980.
9. D. Rytting, “Appendix to an Analysis of Vector Measurement Accuracy Enhancement Techniques,” Hewlett-Packard RF & Microwave Symposium, March 1982.
10. R.B. Marks, “Formulation of the Basic Vector Network Analyzer Error Model Including Switch Terms,” 50th ARFTG Conference Digest, December 1997, pp. 115–126.
11. S.B. Goldberg, M.B. Steer and P.D. Franzon, “Accurate Experimental Characterization of Three Ports,” IEEE International Microwave Symposium Digest, 1991, pp. 241–244.
12. M. Davidovitz, “Reconstruction of the S-matrix for a 3-port Using Measurements at Only Two Ports,” IEEE Microwave and Guided Wave Letters, Vol. 5, No. 10, October 1995, pp. 349–350.
13. A. Ferrero, F. Sanpietro and U. Pisani, “Multiport Vector Analyzer Calibration: A General Formulation,” IEEE Transactions on Microwave Theory and Techniques, Vol. 42, No. 12, December 1994, pp. 2455–2461.
David Blackham received his BSEE degree from Brigham Young University, Provo, UT, his MSEM degree from Stanford University, Stanford, CA, his MSEE degree from National Technological University, Fort Collins, CO, and his PhD degree from the University of Leeds, Leeds, UK. He has been an R&D engineer with Hewlett-Packard and now Agilent Technologies Inc. since 1979. He has worked on the HP8340A Synthesized Sweeper, scalar detectors and bridges, RF and microwave vector network analyzers, and microwave characterization of materials. His current responsibilities include vector error correction and measurement accuracy associated with vector network analyzers.
Ken Wong received his BSEE degree from Cal Poly, SLO, in 1972, and has been with Hewlett-Packard and now Agilent Technologies Inc. since then. His experience at HP/Agilent includes product design, manufacturing process development, and test process development of microwave hybrid microcircuits and instruments. He is currently a senior engineer responsible for the development, design, modeling and measurement of precision microwave electronic and mechanical calibration standards, verification standards, and calibration methodology of vector network analyzers. He is an officer of the ARFTG (Automatic Radio Frequency Techniques Group) Executive Committee and a senior member of the IEEE.
