The growing demand and complexity of advanced microwave systems are changing the paradigms of microwave system production, especially for array-based radar and communication systems. One of the key outcomes of this paradigm shift is that OPEX and the time required for testing modern microwave systems are tracking with the increased complexity of these systems. Previously, long calibration times for S-parameters, power and noise, as well as error-prone and time-consuming and labor-intensive testing, did not dominate microwave system costs. However, time and expense have now become a major hurdle for production testing in many system applications. Much of that time and expense is spent during test equipment calibration and test system setup. This article explores trends in advanced microwave system production, focusing on system quality and performance testing. It introduces how advanced automation and calibration technologies can reduce time, enhance reliability, repeatability and accuracy, along with minimizing operator error in microwave system testing.
HOW RADAR AND COMMUNICATION TECHNOLOGY TRENDS IMPACT MICROWAVE TEST
Radar and communications antenna systems have become indispensable for military, government, public safety, civilian and industrial applications. Wireless communication, sensing and networking are now ubiquitous. This popularity and increased adoption have increased competition and the rate of innovation and advancement. These wireless communication and sensing systems have seen a shift toward higher frequencies, larger operating bandwidths, direct digital synthesis/conversion and the development of advanced/active antenna systems (AAS). Evolution in wireless communication and sensing has been instrumental in enhancing the performance of these systems and enabling new techniques that provide superior utility for various applications.
However, these advancements bring an increase in complexity, especially with the move to higher frequencies and bandwidths, along with increased system port counts to enable advanced beamforming and MIMO functionality. These design and production issues have largely been addressed, but some challenges remain. These remaining challenges revolve around calibration times for S-parameters, power and noise, as well as minimizing human error during the fixturing and interconnect process.
Current test system calibration and setup procedures for wireless applications support the cost and yield expectations of the business model for those applications. However, with pressure on government and capital expenditures, coupled with a desire to reduce design cycles in all applications, system testing is under more scrutiny. Many emerging wireless communication and sensing systems have tens of ports and a single interconnect misalignment or calibration mishap can result in failures. This concern is exacerbated as wireless systems evolve to be more complex, have more ports and operate at higher frequencies and greater bandwidths.
Electronic calibration (eCal) technology was developed to help minimize user calibration error, reduce calibration time and enhance calibration repeatability. However, the technology was not designed to tackle emerging systems with high port-counts. eCal improves calibration standards for S-parameter testing but different standards and methods are often needed for power and noise testing calibrations. A power sensor is needed for power calibrations and these sensors must be metrology grade and each port that needs power calibration must be tested. Similarly, additional noise calibration features, like a noise source or the ability to present a desired characteristic impedance are required to extract noise parameters.
Traditionally, S-parameter, power and noise calibrations were performed separately. These calibrations often required separate test setups, standards and interconnects. This creates a challenge in harmonizing test results, often requiring different personnel addressing test devices, test equipment and data.
A significant factor causing test setup errors is connecting, disconnecting and cycling the interconnects. Threaded coaxial connectors are the most common RF test interconnect method and these connector types require precise torque for proper RF connection. They are reliable and repeatable if connected to specifications, but variations in torque and threading techniques can lead to interconnect electrical performance variations. A big issue with threaded interconnects is the time required to make the connection and the possibility of improper torque. Many systems now use non-threaded coaxial interconnects like probe systems and blind mate connectors. Probe systems require precise positioners and this becomes a challenge with the number of ports requiring testing in emerging systems. Hence, automation and fixturing become important to efficiently probe-test high port-count systems.
Blind mate connectors, often regarded as unreliable with poor repeatability, are now incorporated because of their rapid connect/disconnect capabilities and small profile. The small connector profile enables smaller pitches and higher connector densities for high port-count systems. A drawback of the blind mate connectors is connector alignment during insertion has a significant impact on the electrical performance of the connector. Blind mate connectors can have comparable performance and be as reliable and repeatable as threaded connectors if they are inserted with the proper alignment and force. However, this is difficult to do consistently without automation.
EMBRACING AUTOMATION TO ADDRESS SYSTEM TEST CHALLENGES
A solution to these test challenges involves automated systems that minimize operator error, shorten calibration times, enhance calibration repeatability and accelerate test fixturing and interconnect while improving repeatability and reliability. This implies a fully-automated calibration system handling large multi-port devices under test (DUTs) and test equipment, automated fixturing and interconnect systems. This system could also include robotics for handling and alignment. While such a system is possible, a more economical, faster and simpler solution may be a modular system with custom components to accommodate specific DUT requirements. The diversity of DUT needs, manufacturing processes and additional test criteria prioritize customized fixture and handling features and automation that reduces test time and enhances reliability. These advantages may offset the cost of customization. Properly designed automation systems can dramatically enhance testing throughput and reduce the cost per test.
The Next Stage of Microwave Test Calibration
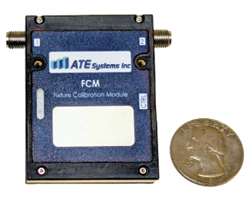
Figure 1 Single-path inline calibration module.
Reducing interconnect cycling during the calibration process, especially with vector network analyzers (VNAs), is a key enabler for automated RF testing. Traditionally, RF calibration of VNAs requires connecting calibration standards to the appropriate DUT and VNA ports, often in sequence, which minimizes operator error and improves software control. eCal, a two-decade-old advancement of this calibration technique, incorporates calibration standards into a unit that includes some electronic control, software and data allowing for coordination with a VNA. An eCal, which must be factory-calibrated periodically, communicates data from various calibration states to the VNA. The eCal switches between standards, meaning the operator only needs to connect and disconnect the eCal module for the calibration and then connect the test cables to the DUT. eCal systems are typically only used for S-parameter calibration. Figure 1 shows an example of an inline calibration module.
There are several methods to automate RF calibration. Robotic systems can properly connect and disconnect calibration standards, including an eCal, and then connect cables to the DUT. High RF port counts would require a very sophisticated robotic system and this would not eliminate the potential for interconnect cycling error. In addition, the test system would still change as the calibration connections and test leads were cycled.
To minimize these concerns, the DUT must have a single connection and the calibration standards must connect directly to the test equipment. This approach requires an integrated calibration system or a standalone calibration system that accommodates a sufficiently high port-count and allows the test signals to pass through the calibration standard. This would require one connection between the DUT and the calibration system and one connection between the calibration system and the VNA. This inline calibration feature has many advantages, including reducing the chance of operator error by reducing the number of connections between the calibration system and the DUT. This stage could be automated, further reducing handling and interconnect errors.
An inline calibration system for systems with many ports may be costly and complex. Cost and complexity can be reduced with a solution consisting of a modular approach with small single-port or multi-port inline calibration units. These units can provide the required calibration standards for the DUT and test equipment port-count needs. More compact and modular inline calibration units can be placed close to the DUT ports, reducing the interconnect length between the two systems. For example, an inline calibration unit can be placed on the coaxial interconnect of a probe system. Probe heads are typically characterized from the interconnect to the probe tip and this de-embedded data can be programmed into the VNA. An inline calibration unit at the coaxial port of the probe head allows for calibration to the probe tip and the probe can be arranged for ease and speed of testing. Compact and modular inline calibration devices also enable direct connection to DUT ports without additional support or fixturing. This, in turn, enables very compact automated systems with short interconnects.
The next evolution of this calibration technique is to include power sensing and a noise source in the inline calibration system. This would allow for small-signal S-parameters, power and noise calibration and testing to be done with one setup. It would also eliminate the need to cycle interconnects with the DUT. This technique would harmonize the results of small-signal S-parameters and large signal power measurements. Since the test equipment and DUT will see impedance standards, the corrected noise figure can easily be determined from the extracted noise parameters. The corrected noise figure is more useful than the nominal scalar noise figure that is typically measured. Extracting the noise figure with known and variable source impedance results in a source-pull noise figure and a noise parameter plot. This plot includes the nominal noise figure, along with noise figure performance in response to a varying source impedance. This plot allows the user to determine DUT sensitivity varying antenna impedance and this can be valuable for active/advanced antenna systems.
Including S-parameters, power and noise into a single inline calibration standard in the test leads between the DUT and test equipment helps eliminate interconnect error and could dramatically decrease the calibration and testing time per DUT. In some cases, S-parameter, power and noise calibration testing are done at different test stations by different operators or as part of a series of calibrations and tests. An inline calibration unit with S-parameter, power and noise calibration and testing features would allow these tests to be done in a single location and under virtually the same conditions. This can help eliminate testing variances that could cause false failures or false passes for DUTs by establishing a consistent baseline that eliminates the need to account for different test stations, operators or the time required to perform traditional multi-domain testing.
Automation Accelerates Test and Eliminates Operator Error
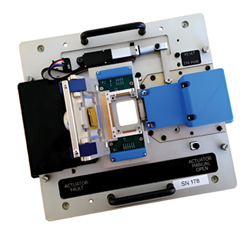
Figure 2 Automated fixture with robotic interconnect and handling features. Source: ATE Systems Inc.
The next challenge is automating part and material handling, along with interconnect. These are two separate challenges that have many closely related dependencies. How a part or material is handled and how accurately it can be placed influences the required tolerances of an automated interconnect system. Generalized robotic systems that use artificial intelligence and machine learning systems to ensure accurate and reliable connections over a wide range of tolerances are possible. However, these systems are costly and require substantial development resources and a long development cycle. For many applications, it may be more efficient to use a precision part or material handling system that uses alignment features like a cassette or plate. Alignment features for part handling simplify the robotic system so that it only needs to consider a range of tolerances along specific axes. In robotics applications, limiting the number of axes of movement results in simpler and less costly developments. Single-axis robotic systems can be easily developed to accommodate tolerances as low as 10s of micrometers. Greater precision can be achieved at higher costs and development time. Figure 2 shows an example of an automated fixture with robotic interconnect and handling features for a high frequency module that includes thermal environmental controls.
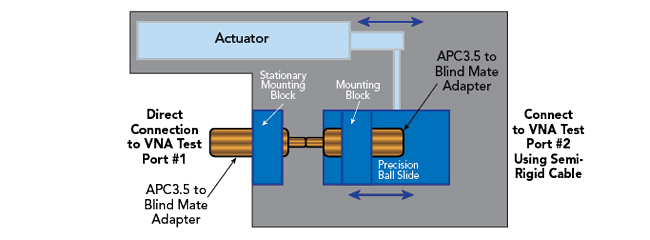
Figure 3 Test setup using a robotic actuator.
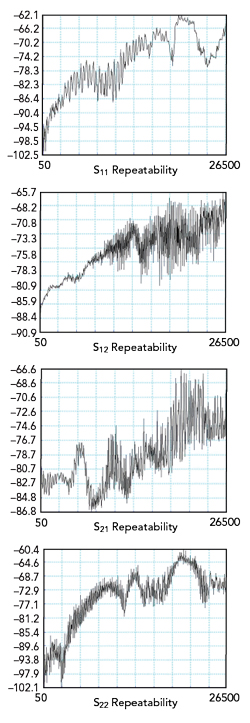
Figure 4 S-parameter repeatability results.
Robotic interconnect systems for coaxial interconnect can solve the challenges of reliability and repeatability in blind mate connectors. These systems are well-suited to probe technologies like probe heads and pogo pins or pogo probes. Practical tests have demonstrated that robotic systems can achieve similar, or better, levels of repeatability and reliability with blind mate coaxial connectors when compared with precision-threaded coaxial connectors installed by an experienced operator. Figure 3 shows the setup for this experiment. The vectorial differences of the S-parameters are captured using this test setup and compared over frequency. After a reference measurement is made, the connection is cycled and another set of measurements is made. The process was repeated for 200 cycles and the complex difference is then computed and the magnitude, in dB, of that complex difference is analyzed. Figure 4 shows the S-parameter results.
A repeatability value of -50 dB is generally acceptable and comparable with threaded coaxial connectors of a comparable size and engagement method. This metric is possible using a robotic interconnect technique with blind mate connectors. The data from this experiment showed a worst-case repeatability better than -60 dB and a worst-case transmission phase repeatability of 0.17 degrees. To achieve this level of reliability and repeatability using automation requires precision alignment in all axes, including depth of insertion and insertion force. Performing such a feat over many cycles is typically challenging, if not impossible, for a human operator.
A complete fixture for communications and radar/sensing systems requires more than RF interconnects. These systems typically require interconnects for digital I/O, DC/AC power, bias voltages and currents, analog I/O and potentially, other test ports and features. All these electrical stimuli and signals, along with thermal and other environmental conditions must be accounted for during testing. In many cases, the DUTs require shielding, depending on the proximity of other test systems, production equipment and electrical systems that could interfere with the quality and repeatability of the testing.
Designing for Inline Calibration and Test Automation
With automated fixturing and interconnect engagement complementing inline calibration technology, it is possible to design completely automated test systems with optimally-designed cable management, shielding and environmental controls that ensure the desired testing environment to a high level of reliability and repeatability. Achieving the same performance and capability from a test system that relies on human operators would be much more difficult. The automated system minimizes the interconnect lengths between the test equipment and the DUT. This is critical for the dynamic range of high frequency test systems that have high conductive and dielectric losses in coaxial transmission lines.
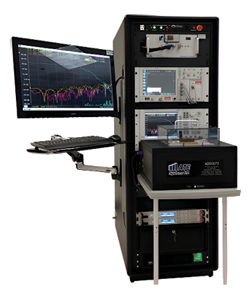
Figure 5 Automated test rack and fixture with robotic handling and interconnect. Source: ATE Systems Inc.
However, some considerations must be addressed to enable a high degree of automation. With inline calibration technology available, test designers must include APIs and other software tools for inline calibration in the test process programming. While this will likely involve a learning curve, it should not be significantly different from the learning curve associated with an eCal system. A custom automated test rack and fixture with robotic handling and interconnect for a microwave radar board is shown in Figure 5. The key interconnect and calibration elements are in a shielding box that enhances the overall test fidelity in noisy production and test environments.
The most cost- and time-efficient approach to automated part/material handling and interconnect would include a custom test fixture that enables automatic interconnect engagement. Such a system would benefit from a precision-machined housing as the carrier for the interconnect. To minimize interconnect tolerances for laminated parts such as PCBs, the carrier must include some type of precision guides for surface-mount connectors that are “floated” during the reflow process. Achieving a tolerance of a few thousandths of an inch in the DUT interconnect position requires precision alignment throughout the production process. If these features are not already included, they must be developed. Though modern blind mate interconnects, such as G3PO, can have pitches on the order of tens of millimeters, it may be necessary to increase the pitch of the connector ports to allow them to comply with the robotic interconnect engagement system requirements. With these constraints, it is advisable to consider automated testing during the part and material development process to minimize the automated system development effort, cost and time.
CONCLUSION
The accelerating advancement of communications and sensing/radar technology, along with the heightened pressures this evolution is placing on production tests, are strengthening the argument for additional automation in RF calibration and testing. There are clear advantages to automating RF communication and sensing calibration and testing for many applications where test throughput and yield are critical metrics. The value of test automation increases with the value of the DUT, as errors during calibration and testing can result in parts being passed or failed at much higher rates with human operators than with properly designed automation. Though systems that are complex enough to warrant this degree of automation have traditionally been used only for military, government, space and aerospace applications, there is a growing need for enhanced testing automation for New Space communication and sensing systems and AAS applications, such as satellite-to-user terminals and 5G/6G communications.

