Since their introduction in the 1980s, vector network analyzers (VNA) and S-parameters have become so common they are used in nearly all aspects of an RF device’s life cycle, from research and development to design validation test to production test. It is not uncommon to walk into an RF lab and see VNAs from various suppliers, spanning multiple generations, being used interchangeably, from the original HP 8510 and Wiltron 360 to the latest Keysight PNA-X, R&S ZNA, Anritsu VectorStar or Copper Mountain Cobalt. Several challenges come from using so many different VNAs, each with different interfaces and capabilities: ensuring VNA users are properly trained on every model in their labs; eliminating simple mistakes caused by differences in VNA terminologies, calibration standards definitions and calibration flows; and validating VNA calibrations so users have confidence in their measurements.
Additionally, it is not enough to think about a single lab; today’s global organizations have multiple labs in various countries, with multinational teams collaborating on projects. This global scale introduces another set of challenges, such as saving important settings and measurement data in sharable formats and improving visualization and analysis so better decisions are made more efficiently. Finally, as organizations strive to understand more about device performance and face more stringent specifications, challenges arise related to data accuracy. It is crucial to understand and include all sources of error in a measurement setup and be able to quantify the uncertainty contribution and impact to device performance.
Insight VNA Software
Insight, Maury Microwave’s VNA calibration and measurement software platform, is designed to empower VNA users, helping them make better decisions. Insight represents a paradigm shift in the way users approach VNA calibration, validation, measurement, visualization and analysis. With Insight, users can
- Use a single software platform with most commercial VNAs.
- Define mechanical calibration standards from any supplier and use them with all VNAs.
- Avoid common errors with a simplified calibration process, powered by an intuitive graphical user interface and wizard.
- Validate VNA calibration using airlines and individually characterized verification kits.
- Measure S-parameters and save S2P files for easy data sharing.
- Understand measurement results better with advanced visualization and analysis tools.
- Identify and quantify the individual contributions of uncertainty and display uncertainty boundaries alongside measurement results.
To provide the best experience, Insight guides users through five simple steps:
Define the System Library
The system library is the database of instruments and accessories used to calibrate, validate and measure S-parameters. The database of VNAs comprises VNA drivers and the GPIB or network address; VNA calibration kits, which define connector type and gender and whether the kit uses polynomial definitions or individually characterized standards; and calibration verification kits.
When calibrating and measuring with uncertainty, the system library identifies and quantifies the uncertainty contribution of each component in a measurement setup, including VNA drift and noise floor, calibration kit factory uncertainty, the transmission and reflection uncertainty of cable assemblies (related to amplitude and phase stability with flexure) and the repeatability of connectors (related to the impact of pin depth, concentricity and user etiquette).
Use the Calibration Wizard
The calibration wizard guides users through the calibration process. This includes selecting the VNA from the database and defining the VNA properties (port numbers, power, averaging, IF bandwidth, etc.), defining the frequencies for calibration (linear step or custom list), selecting the calibration kit from the dataset, defining the calibration method and calibrating by connecting and measuring each standard and computing the error terms (see Figure 1).

Figure 1 Insight VNA calibration wizard.
Validate the VNA Calibration

Figure 2 Calibration validation with overlapping uncertainty boundaries.
The calibration validation wizard guides users through the validation process. This includes selecting the VNA calibration verification kit from the database, validating the source match using beadless airlines and a short and validating the calibration by using a characterized device verification kit that compares a user’s measured data with factory-measured data and calculates the error vector.
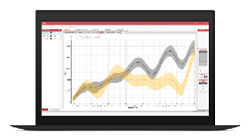
Calibration validation can be expanded to take advantage of uncertainty when used with a characterized device calibration kit and characterized device verification kit. Validating with uncertainty compares the uncertainty boundaries measured on a verification device by the user with the uncertainty boundaries measured on the same verification device at the factory and defines a passing validation as one where the uncertainty boundaries overlap (see Figure 2).
Measure Using the Real-Time Measurement Interface
The real-time measurement interface enables users to take live measurements. This includes setting VNA options (IF bandwidth, averaging, port power), defining plots to visualize measurement data, setting the sweep mode (single, continuous, hold), saving measurement data to memory or as S2P files, comparing and normalizing data sets for analysis and creating specifications files for comparison and analysis.
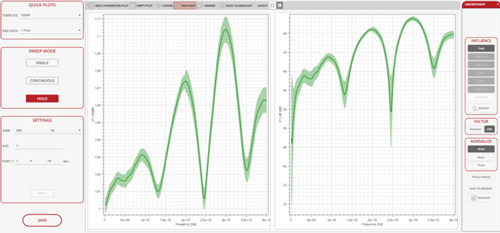
When calibrating and measuring with uncertainty, individual uncertainty contributors can be activated, and measurement data can be plotted with uncertainty boundaries (see Figure 3). The uncertainty budget tool reports the individual uncertainty contributions of the VNA, calibration kit, cable and connector as a percentage of the total at each frequency, enabling users to concentrate on improving the largest contributors for more accurate measurement results.

Figure 3 Real-time device measurements with uncertainty boundaries.
Visualize and Analyze Measurement Data
To ensure consistent and repeatable measurement analysis, the visualization and data analysis tool empowers users to visualize and analyze measurement data by creating, saving and sharing visualization templates or using a quick plot. It also allows user to create sessions (template and measurements data) to share among collaborators, load and compare multiple saved data sets, create custom expressions from measured S-parameters and export data as CSV and image files.
Maury Microwave
Ontario, Calif.
www.maurymw.com
(909) 987-4715
